Getting Started
What is Flowable?
Flowable is a light-weight business process engine written in Java. The Flowable process engine allows you to deploy BPMN 2.0 process definitions (an industry XML standard for defining processes), creating process instances of those process definitions, running queries, accessing active or historical process instances and related data, plus much more. This section will gradually introduce various concepts and APIs to do that through examples that you can follow on your own development machine.
Flowable is extremely flexible when it comes to adding it to your application/services/architecture. You can embed the engine in your application or service by including the Flowable library, which is available as a JAR. Since it’s a JAR, you can add it easily to any Java environment: Java SE; servlet containers, such as Tomcat or Jetty, Spring; Java EE servers, such as JBoss or WebSphere, and so on. Alternatively, you can use the Flowable REST API to communicate over HTTP. There are also several Flowable Applications (Flowable Modeler, Flowable Admin, Flowable IDM and Flowable Task) that offer out-of-the-box example UIs for working with processes and tasks.
Common to all the ways of setting up Flowable is the core engine, which can be seen as a collection of services that expose APIs to manage and execute business processes. The various tutorials below start by introducing how to set up and use this core engine. The sections afterwards build upon the knowledge acquired in the previous sections.
The first section shows how to run Flowable in the simplest way possible: a regular Java main using only Java SE. Many core concepts and APIs will be explained here.
The section on the Flowable REST API shows how to run and use the same API through REST.
The section on the Flowable REST App, will guide you through the basics of using the out-of-the-box example Flowable REST application.
Flowable and Activiti
Flowable is a fork of Activiti (registered trademark of Alfresco). In all the following sections you’ll notice that the package names, configuration files, and so on, use flowable.
Building a command-line application
Creating a process engine
In this first tutorial we’re going to build a simple example that shows how to create a Flowable process engine, introduces some core concepts and shows how to work with the API. The screenshots show Eclipse, but any IDE works. We’ll use Maven to fetch the Flowable dependencies and manage the build, but likewise, any alternative also works (Gradle, Ivy, and so on).
The example we’ll build is a simple holiday request process:
the employee asks for a number of holidays
the manager either approves or rejects the request
we’ll mimic registering the request in some external system and sending out an email to the employee with the result
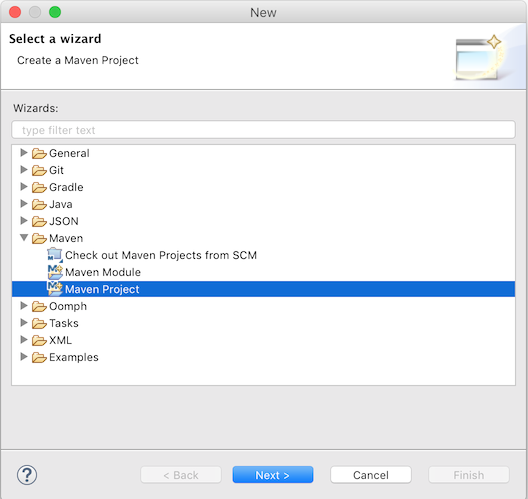
First, we create a new Maven project through File → New → Other → Maven Project
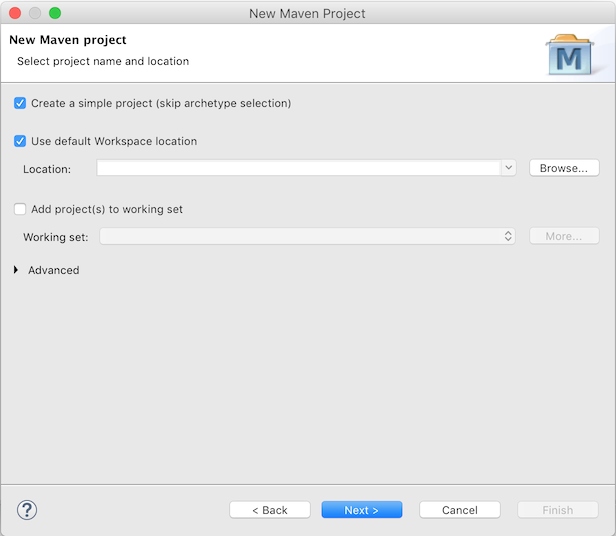
In the next screen, we check 'create a simple project (skip archetype selection)'
And fill in some 'Group Id' and 'Artifact id':
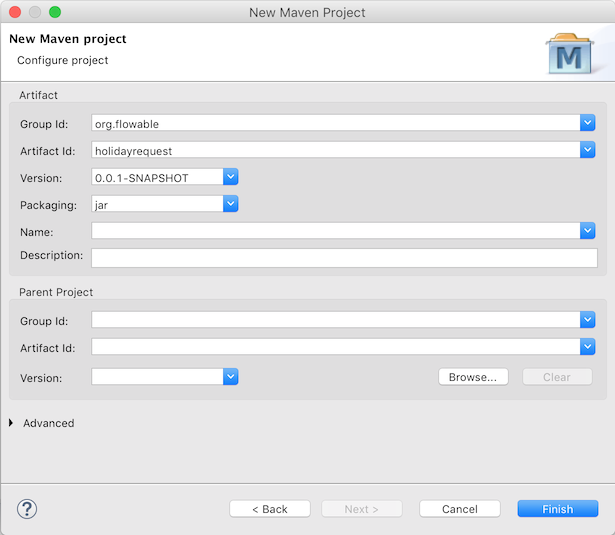
We now have an empty Maven project, to which we’ll add two dependencies:
The Flowable process engine, which will allow us to create a ProcessEngine object and access the Flowable APIs.
An in-memory database, H2 in this case, as the Flowable engine needs a database to store execution and historical data while running process instances. Note that the H2 dependency includes both the database and the driver. If you use another database (for example, PostgresQL, MySQL, and so on), you’ll need to add the specific database driver dependency.
Add the following to your pom.xml file:
<dependencies>
  <dependency>
    <groupId>org.flowable</groupId>
    <artifactId>flowable-engine</artifactId>
    <version>7.0.0</version>
  </dependency>
  <dependency>
    <groupId>com.h2database</groupId>
    <artifactId>h2</artifactId>
    <version>2.1.214</version>
  </dependency>
</dependencies>
If the dependent JARs are not automatically retrieved for some reason, you can right-click the project and select 'Maven → Update Project' to force a manual refresh (but this should not be needed, normally). In the project, under 'Maven Dependencies', you should now see the flowable-engine and various other (transitive) dependencies.
Create a new Java class and add a regular Java main method:
package org.flowable;

public class HolidayRequest {

  public static void main(String[] args) {

  }

}
The first thing we need to do is to instantiate a ProcessEngine instance. This is a thread-safe object that you typically have to instantiate only once in an application. A ProcessEngine is created from a ProcessEngineConfiguration instance, which allows you to configure and tweak the settings for the process engine. Often, the ProcessEngineConfiguration is created using a configuration XML file, but (as we do here) you can also create it programmatically. The minimum configuration a ProcessEngineConfiguration needs is a JDBC connection to a database:
package org.flowable;

import org.flowable.engine.ProcessEngine;
import org.flowable.engine.ProcessEngineConfiguration;
import org.flowable.engine.impl.cfg.StandaloneProcessEngineConfiguration;

public class HolidayRequest {

  public static void main(String[] args) {
    ProcessEngineConfiguration cfg = new StandaloneProcessEngineConfiguration()
      .setJdbcUrl("jdbc:h2:mem:flowable;DB_CLOSE_DELAY=-1")
      .setJdbcUsername("sa")
      .setJdbcPassword("")
      .setJdbcDriver("org.h2.Driver")
      .setDatabaseSchemaUpdate(ProcessEngineConfiguration.DB_SCHEMA_UPDATE_TRUE);

    ProcessEngine processEngine = cfg.buildProcessEngine();
  }

}
In the code above, on line 10, a standalone configuration object is created. The 'standalone' here refers to the fact that the engine is created and used completely by itself (and not, for example, in a Spring environment, where you’d use the SpringProcessEngineConfiguration class instead). On lines 11 to 14, the JDBC connection parameters to an in-memory H2 database instance are passed. Important: note that such a database does not survive a JVM restart. If you want your data to be persistent, you’ll need to switch to a persistent database and switch the connection parameters accordingly. On line 15 we’re setting a flag to true to make sure that the database schema is created if it doesn’t already exist in the database pointed to by the JDBC parameters. Alternatively, Flowable ships with a set of SQL files that can be used to create the database schema with all the tables manually.
The ProcessEngine object is then created using this configuration (line 17).
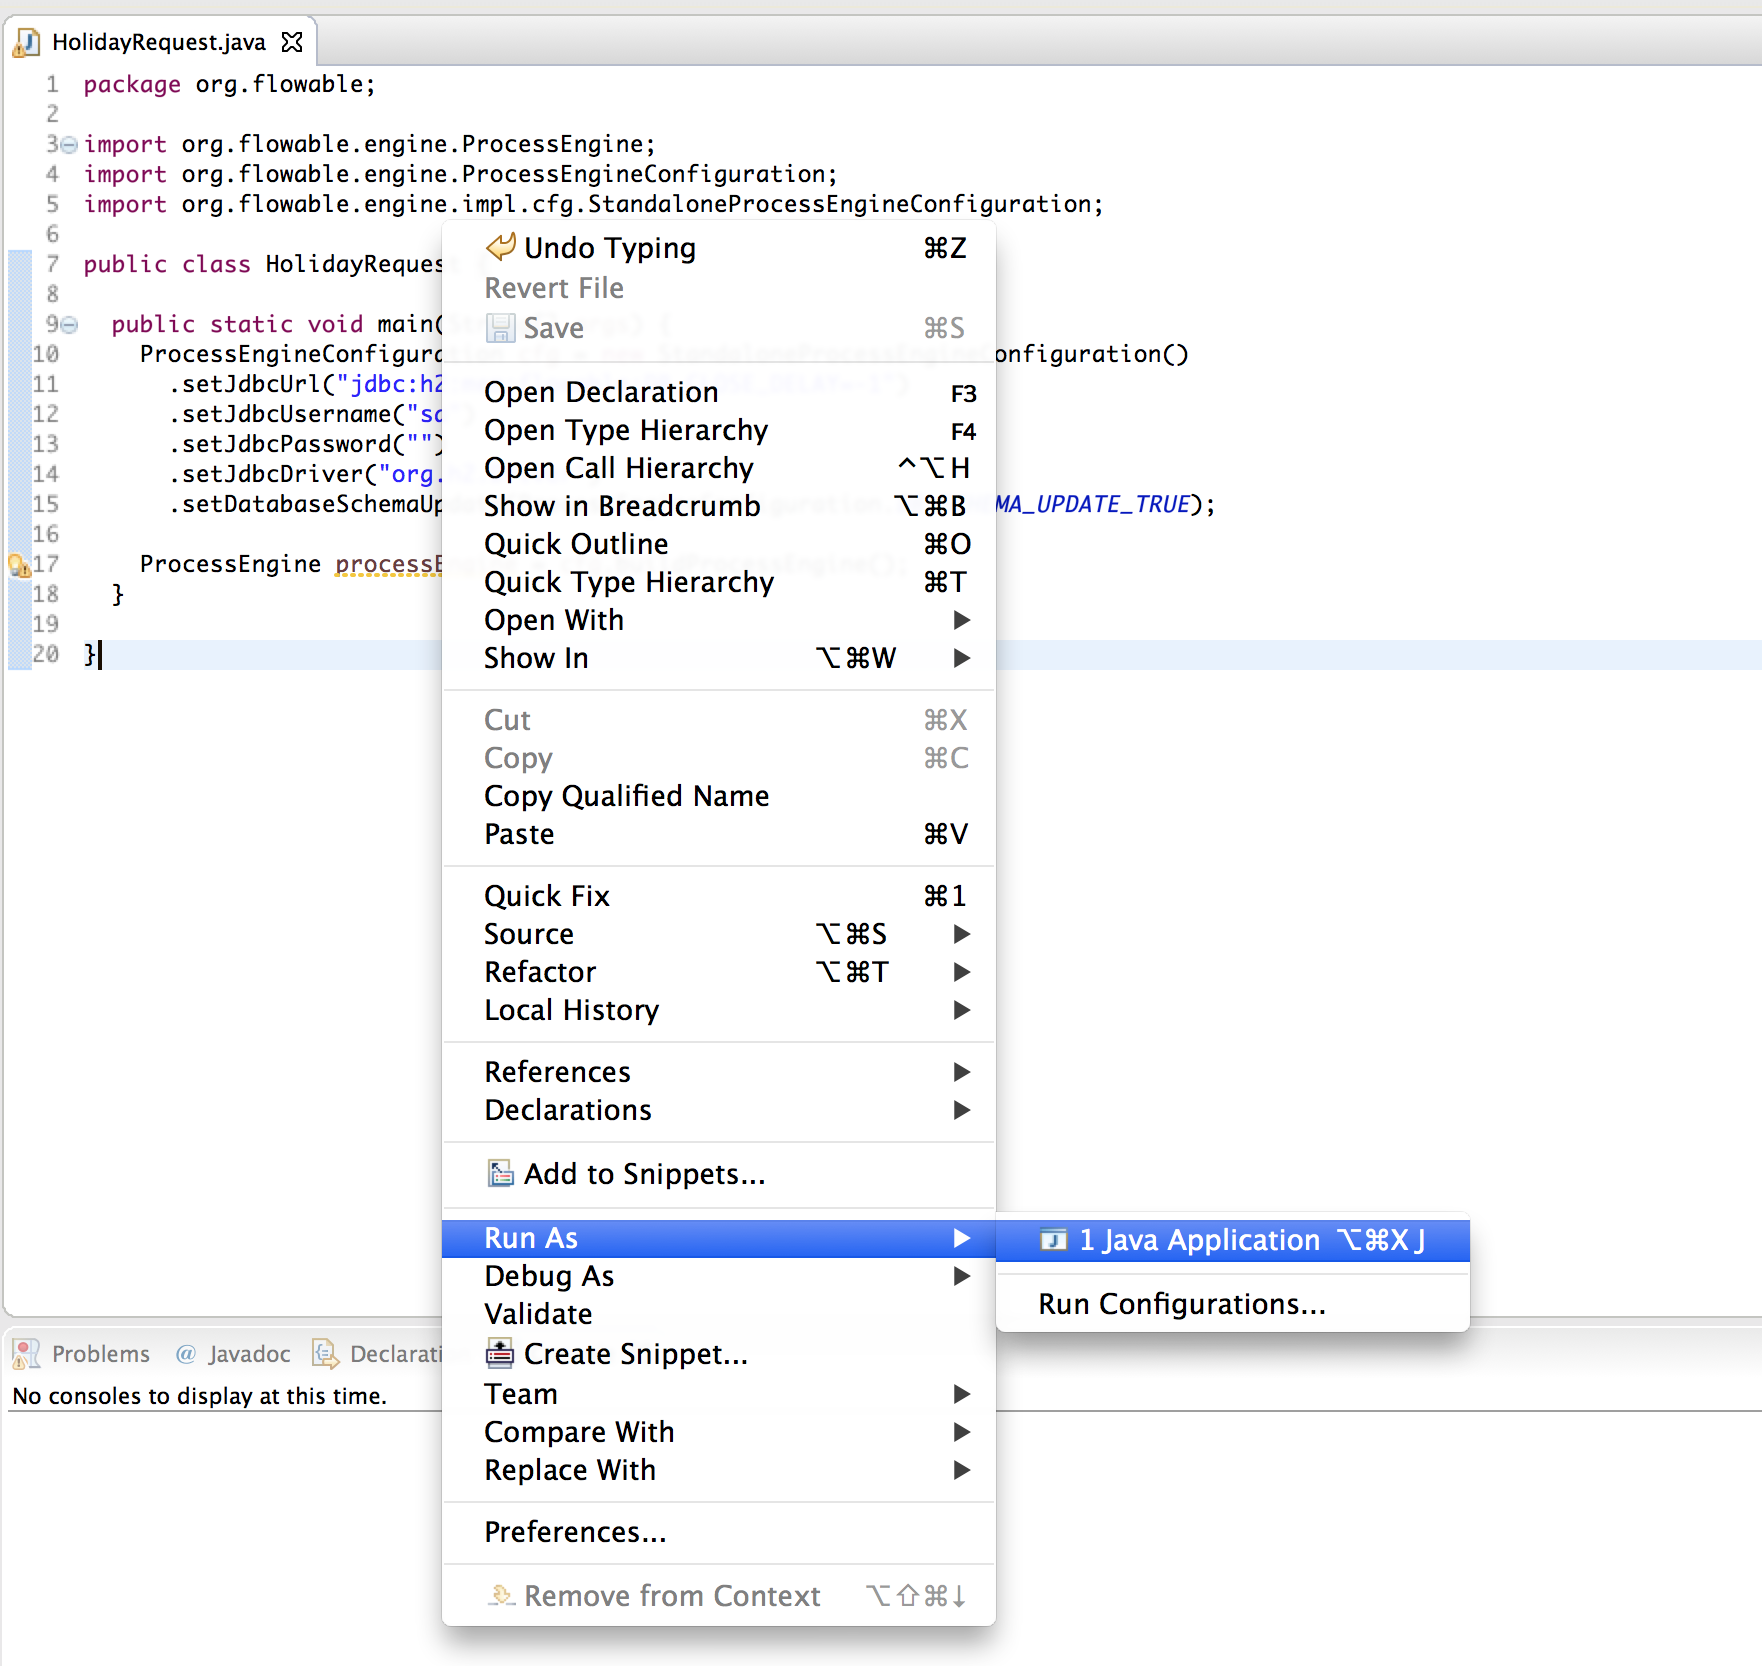
You can now run this. The easiest way in Eclipse is to right-click on the class file and select Run As → Java Application:
The application runs without problems, however, no useful information is shown in the console except a message stating that the logging has not been configured properly:

Flowable uses SLF4J as its logging framework internally. For this example, we’ll use the log4j logger over SLF4j, so add the following dependencies to the pom.xml file:
<dependency>
  <groupId>org.slf4j</groupId>
  <artifactId>slf4j-api</artifactId>
  <version>2.0.7</version>
</dependency>
<dependency>
  <groupId>org.slf4j</groupId>
  <artifactId>slf4j-log4j12</artifactId>
  <version>2.0.7</version>
</dependency>
Log4j needs a properties file for configuration. Add a log4j.properties file to the src/main/resources folder with the following content:
log4j.rootLogger=DEBUG, CA

log4j.appender.CA=org.apache.log4j.ConsoleAppender
log4j.appender.CA.layout=org.apache.log4j.PatternLayout
log4j.appender.CA.layout.ConversionPattern= %d{hh:mm:ss,SSS} [%t] %-5p %c %x - %m%n
Rerun the application. You should now see informative logging about the engine booting up and the database schema being created in the database:

We’ve now got a process engine booted up and ready to go. Time to feed it a process!
Deploying a process definition
The process we’ll build is a very simple holiday request process. The Flowable engine expects processes to be defined in the BPMN 2.0 format, which is an XML standard that is widely accepted in the industry. In Flowable terminology, we speak about this as a process definition. From a process definition, many process instances can be started. Think of the process definition as the blueprint for many executions of the process. In this particular case, the process definition defines the different steps involved in requesting holidays, while one process instance matches the request for a holiday by one particular employee.
BPMN 2.0 is stored as XML, but it has a visualization part too: it defines in a standard way how each different step type (a human task, an automatic service call, and so on) is represented and how to connect these different steps to each other. Through this, the BPMN 2.0 standard allows technical and business people to communicate about business processes in a way that both parties understand.
The process definition we’ll use is the following:
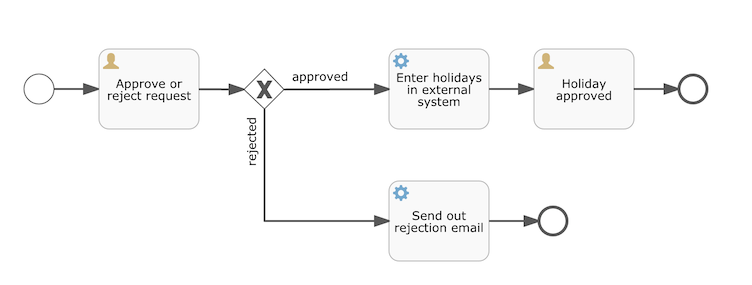
The process should be quite self-explanatory, but for clarity’s sake let’s describe the different bits:
We assume the process is started by providing some information, such as the employee name, the amount of holiday requested and a description. Of course, this could be modeled as a separate first step in the process. However, by having it as 'input data' for the process, a process instance is only actually created when a real request has been made. In the alternative case, a user could change his mind and cancel before submitting, yet the process instance would now be there. In some scenarios this could be valuable information (for example, how many times is a request started, but not finished), depending on the business goal.
The circle on the left is called a start event. It’s the starting point of a process instance.
The first rectangle is a user task. This is a step in the process that a human user has to perform. In this case, the manager needs to approve or reject the request.
Depending on what the manager decides, the exclusive gateway (the diamond shape with the cross) will route the process instance to either the approval or the rejection path.
If approved, we have to register the request in some external system, which is followed by a user task again for the original employee that notifies them of the decision. This could, of course, be replaced by an email.
If rejected, an email is sent to the employee informing them of this.
Typically, such a process definition is modeled with a visual modeling tool, such as the Flowable Designer (Eclipse) or the Flowable Modeler (web application).
Here, however, we’re going to write the XML directly to familiarize ourselves with BPMN 2.0 and its concepts.
The BPMN 2.0 XML corresponding to the diagram above is shown below. Note that this is only the 'process part'. If you’d used a graphical modeling tool, the underlying XML file also contains the 'visualization' part that describes the graphical information, such as the coordinates of the various elements of the process definition (all graphical information is contained in the BPMNDiagram tag in the XML, which is a child element of the definitions tag).
Save the following XML in a file named holiday-request.bpmn20.xml in the src/main/resources folder.
<?xml version="1.0" encoding="UTF-8"?>
<definitions xmlns="http://www.omg.org/spec/BPMN/20100524/MODEL"
  xmlns:xsi="http://www.w3.org/2001/XMLSchema-instance"
  xmlns:xsd="http://www.w3.org/2001/XMLSchema"
  xmlns:bpmndi="http://www.omg.org/spec/BPMN/20100524/DI"
  xmlns:omgdc="http://www.omg.org/spec/DD/20100524/DC"
  xmlns:omgdi="http://www.omg.org/spec/DD/20100524/DI"
  xmlns:flowable="http://flowable.org/bpmn"
  typeLanguage="http://www.w3.org/2001/XMLSchema"
  expressionLanguage="http://www.w3.org/1999/XPath"
  targetNamespace="http://www.flowable.org/processdef">

  <process id="holidayRequest" name="Holiday Request" isExecutable="true">

    <startEvent id="startEvent"/>
    <sequenceFlow sourceRef="startEvent" targetRef="approveTask"/>

    <userTask id="approveTask" name="Approve or reject request"/>
    <sequenceFlow sourceRef="approveTask" targetRef="decision"/>

    <exclusiveGateway id="decision"/>
    <sequenceFlow sourceRef="decision" targetRef="externalSystemCall">
      <conditionExpression xsi:type="tFormalExpression">
        <![CDATA[
          ${approved}
        ]]>
      </conditionExpression>
    </sequenceFlow>
    <sequenceFlow  sourceRef="decision" targetRef="sendRejectionMail">
      <conditionExpression xsi:type="tFormalExpression">
        <![CDATA[
          ${!approved}
        ]]>
      </conditionExpression>
    </sequenceFlow>

    <serviceTask id="externalSystemCall" name="Enter holidays in external system"
        flowable:class="org.flowable.CallExternalSystemDelegate"/>
    <sequenceFlow sourceRef="externalSystemCall" targetRef="holidayApprovedTask"/>

    <userTask id="holidayApprovedTask" name="Holiday approved"/>
    <sequenceFlow sourceRef="holidayApprovedTask" targetRef="approveEnd"/>

    <serviceTask id="sendRejectionMail" name="Send out rejection email"
        flowable:class="org.flowable.SendRejectionMail"/>
    <sequenceFlow sourceRef="sendRejectionMail" targetRef="rejectEnd"/>

    <endEvent id="approveEnd"/>

    <endEvent id="rejectEnd"/>

  </process>

</definitions>
Lines 2 to 11 look a bit daunting, but it’s the same as you’ll see in almost every process definition. It’s kind of boilerplate stuff that’s needed to be fully compatible with the BPMN 2.0 standard specification.
Every step (in BPMN 2.0 terminology, 'activity') has an id attribute that gives it a unique identifier in the XML file. All activities can have an optional name too, which increases the readability of the visual diagram, of course.
The activities are connected by a sequence flow, which is a directed arrow in the visual diagram. When executing a process instance, the execution will flow from the start event to the next activity, following the sequence flow.
The sequence flows leaving the exclusive gateway (the diamond shape with the X) are clearly special: both have a condition defined in the form of an expression (see line 25 and 32). When the process instance execution reaches this gateway, the conditions are evaluated and the first that resolves to true is taken. This is what the exclusive stands for here: only one is selected. Other types of gateways are, of course, possible if different routing behavior is needed.
The condition written here as an expression is of the form ${approved}, which is a shorthand for ${approved == true}. The variable 'approved' is called a process variable. A process variable is a persistent bit of data that is stored together with the process instance and can be used during the lifetime of the process instance. In this case, it does mean that we will have to set this process variable at a certain point (when the manager user task is submitted or, in Flowable terminology, completed) in the process instance, as it’s not data that is available when the process instance starts.
Now we have the process BPMN 2.0 XML file, we next need to 'deploy' it to the engine. Deploying a process definition means that:
the process engine will store the XML file in the database, so it can be retrieved whenever needed
the process definition is parsed to an internal, executable object model, so that process instances can be started from it.
To deploy a process definition to the Flowable engine, the RepositoryService is used, which can be retrieved from the ProcessEngine object. Using the RepositoryService, a new Deployment is created by passing the location of the XML file and calling the deploy() method to actually execute it:
RepositoryService repositoryService = processEngine.getRepositoryService();
Deployment deployment = repositoryService.createDeployment()
  .addClasspathResource("holiday-request.bpmn20.xml")
  .deploy();
We can now verify that the process definition is known to the engine (and learn a bit about the API) by querying it through the API. This is done by creating a new ProcessDefinitionQuery object through the RepositoryService.
ProcessDefinition processDefinition = repositoryService.createProcessDefinitionQuery()
  .deploymentId(deployment.getId())
  .singleResult();
System.out.println("Found process definition : " + processDefinition.getName());
Starting a process instance
We now have the process definition deployed to the process engine, so process instances can be started using this process definition as a 'blueprint'.
To start the process instance, we need to provide some initial process variables. Typically, you’ll get these through a form that is presented to the user or through a REST API when a process is triggered by something automatic. In this example, we’ll keep it simple and use the java.util.Scanner class to simply input some data on the command line:
Scanner scanner= new Scanner(System.in);

System.out.println("Who are you?");
String employee = scanner.nextLine();

System.out.println("How many holidays do you want to request?");
Integer nrOfHolidays = Integer.valueOf(scanner.nextLine());

System.out.println("Why do you need them?");
String description = scanner.nextLine();
Next, we can start a process instance through the RuntimeService. The collected data is passed as a java.util.Map instance, where the key is the identifier that will be used to retrieve the variables later on. The process instance is started using a key. This key matches the id attribute that is set in the BPMN 2.0 XML file, in this case holidayRequest.
(NOTE: there are many ways you’ll learn later on to start a process instance, beyond using a key)
<process id="holidayRequest" name="Holiday Request" isExecutable="true">

RuntimeService runtimeService = processEngine.getRuntimeService();

Map<String, Object> variables = new HashMap<String, Object>();
variables.put("employee", employee);
variables.put("nrOfHolidays", nrOfHolidays);
variables.put("description", description);
ProcessInstance processInstance =
  runtimeService.startProcessInstanceByKey("holidayRequest", variables);
When the process instance is started, an execution is created and put in the start event. From there, this execution follows the sequence flow to the user task for the manager approval and executes the user task behavior. This behavior will create a task in the database that can be found using queries later on. A user task is a wait state and the engine will stop executing anything further, returning the API call.
Sidetrack: transactionality
In Flowable, database transactions play a crucial role to guarantee data consistency and solve concurrency problems. When you make a Flowable API call, by default, everything is synchronous and part of the same transaction. Meaning, when the method call returns, a transaction will be started and committed.
When a process instance is started, there will be one database transaction from the start of the process instance to the next wait state. In this example, this is the first user task. When the engine reaches this user task, the state is persisted to the database and the transaction is committed and the API call returns.
In Flowable, when continuing a process instance, there will always be one database transaction going from the previous wait state to the next wait state. Once persisted, the data can be in the database for a long time, even years if it has to be, until an API call is executed that takes the process instance further. Note that no computing or memory resources are consumed when the process instance is in such a wait state, waiting for the next API call.
In the example here, when the first user task is completed, one database transaction will be used to go from the user task through the exclusive gateway (the automatic logic) until the second user task. Or straight to the end with the other path.
Querying and completing tasks
In a more realistic application, there will be a user interface where the employees and the managers can log in and see their task lists. With these, they can inspect the process instance data that is stored as process variables and decide what they want to do with the task. In this example, we will mimic task lists by executing the API calls that normally would be behind a service call that drives a UI.
We haven’t yet configured the assignment for the user tasks. We want the first task to go the 'managers' group and the second user task to be assigned to the original requester of the holiday. To do this, add the candidateGroups attribute to the first task:
<userTask id="approveTask" name="Approve or reject request" flowable:candidateGroups="managers"/>
and the assignee attribute to the second task as shown below. Note that we’re not using a static value like the 'managers' value above, but a dynamic assignment based on a process variable that we’ve passed when the process instance was started:
<userTask id="holidayApprovedTask" name="Holiday approved" flowable:assignee="${employee}"/>
To get the actual task list, we create a TaskQuery through the TaskService and we configure the query to only return the tasks for the 'managers' group:
TaskService taskService = processEngine.getTaskService();
List<Task> tasks = taskService.createTaskQuery().taskCandidateGroup("managers").list();
System.out.println("You have " + tasks.size() + " tasks:");
for (int i=0; i<tasks.size(); i++) {
  System.out.println((i+1) + ") " + tasks.get(i).getName());
}
Using the task identifier, we can now get the specific process instance variables and show on the screen the actual request:
System.out.println("Which task would you like to complete?");
int taskIndex = Integer.valueOf(scanner.nextLine());
Task task = tasks.get(taskIndex - 1);
Map<String, Object> processVariables = taskService.getVariables(task.getId());
System.out.println(processVariables.get("employee") + " wants " +
    processVariables.get("nrOfHolidays") + " of holidays. Do you approve this?");
Which, if you run this, should look something like this:
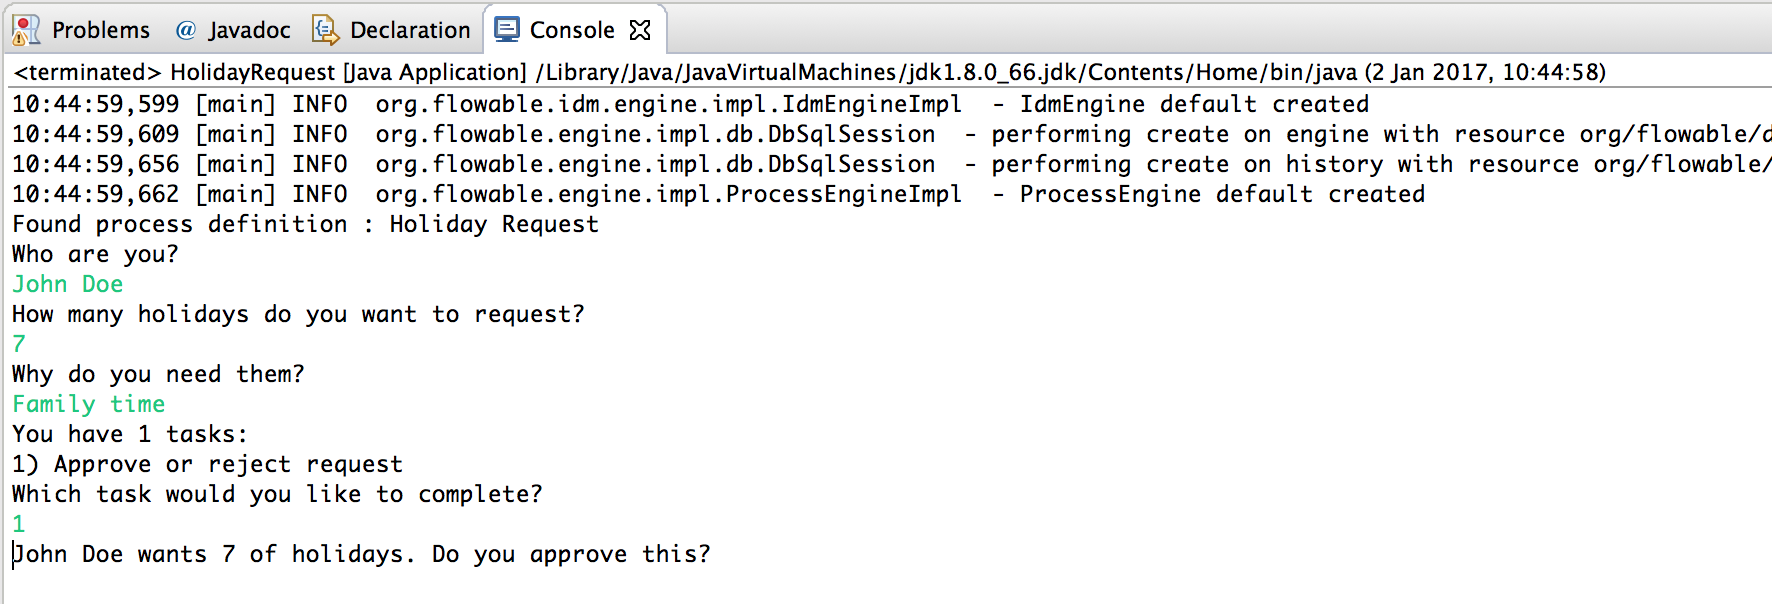
The manager can now complete the task. In reality, this often means that a form is submitted by the user. The data from the form is then passed as process variables. Here, we’ll mimic this by passing a map with the 'approved' variable (the name is important, as it’s used later on in the conditions of the sequence flow!) when the task is completed:
boolean approved = scanner.nextLine().toLowerCase().equals("y");
variables = new HashMap<String, Object>();
variables.put("approved", approved);
taskService.complete(task.getId(), variables);
The task is now completed and one of the two paths leaving the exclusive gateway is selected based on the 'approved' process variable.
Writing a JavaDelegate
There is a last piece of the puzzle still missing: we haven’t implemented the automatic logic that will get executed when the request is approved. In the BPMN 2.0 XML this is a service task and it looked above like:
<serviceTask id="externalSystemCall" name="Enter holidays in external system"
    flowable:class="org.flowable.CallExternalSystemDelegate"/>
In reality, this logic could be anything, ranging from calling a service with HTTP REST, to executing some legacy code calls to a system the organization has been using for decades. We won’t implement the actual logic here but simply log the processing.
Create a new class (File → New → Class in Eclipse), fill in org.flowable as package name and CallExternalSystemDelegate as class name. Make that class implement the org.flowable.engine.delegate.JavaDelegate interface and implement the execute method:
package org.flowable;

import org.flowable.engine.delegate.DelegateExecution;
import org.flowable.engine.delegate.JavaDelegate;

public class CallExternalSystemDelegate implements JavaDelegate {

    public void execute(DelegateExecution execution) {
        System.out.println("Calling the external system for employee "
            + execution.getVariable("employee"));
    }

}
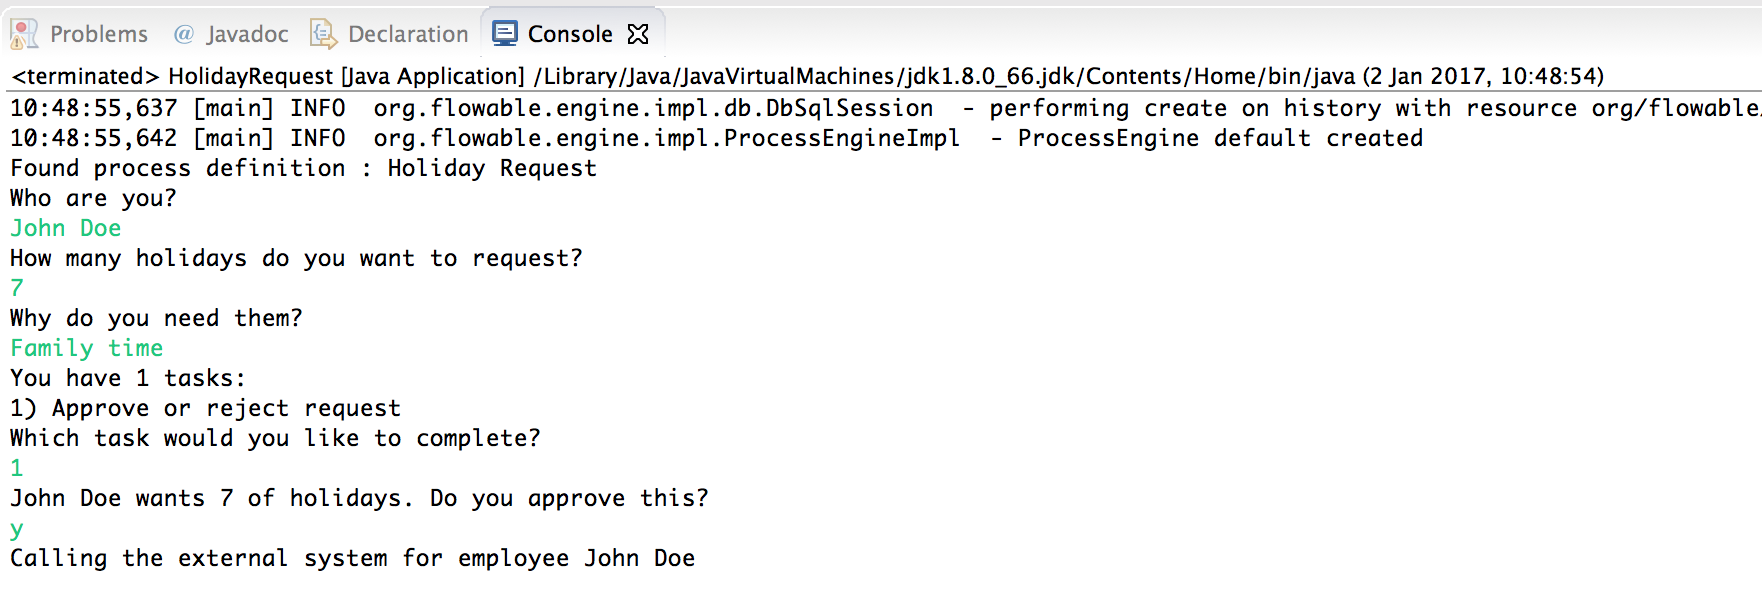
When the execution arrives at the service task, the class that is referenced in the BPMN 2.0 XML is instantiated and called.
When running the example now, the logging message is shown, demonstrating the custom logic is indeed executed:
Working with historical data
One of the many reasons for choosing to use a process engine like Flowable is because it automatically stores audit data or historical data for all the process instances. This data allows the creation of rich reports that give insights into how the organization works, where the bottlenecks are, etc.
For example, suppose we want to show the duration of the process instance that we’ve been executing so far. To do this, we get the HistoryService from the ProcessEngine and create a query for historical activities. In the snippet below you can see we add some additional filtering:
only the activities for one particular process instance
only the activities that have finished
The results are also sorted by end time, meaning that we’ll get them in execution order.
HistoryService historyService = processEngine.getHistoryService();
List<HistoricActivityInstance> activities =
  historyService.createHistoricActivityInstanceQuery()
   .processInstanceId(processInstance.getId())
   .finished()
   .orderByHistoricActivityInstanceEndTime().asc()
   .list();

for (HistoricActivityInstance activity : activities) {
  System.out.println(activity.getActivityId() + " took "
    + activity.getDurationInMillis() + " milliseconds");
}
Running the example again, we now see something like this in the console:
startEvent took 1 milliseconds
approveTask took 2638 milliseconds
decision took 3 milliseconds
externalSystemCall took 1 milliseconds
Conclusion
This tutorial introduced various Flowable and BPMN 2.0 concepts and terminology, while also demonstrating how to use the Flowable API programmatically.
Of course, this is just the start of the journey. The following sections will dive more deeply into the many options and features that the Flowable engine supports. Other sections go into the various ways the Flowable engine can be set up and used, and describe in detail all the BPMN 2.0 constructs that are possible.
Getting started with the Flowable REST API
This section shows the same example as the previous section: deploying a process definition, starting a process instance, getting a task list and completing a task. If you haven’t read that section, it might be good to skim through it to get an idea of what is done there.
This time, the Flowable REST API is used rather than the Java API. You’ll soon notice that the REST API closely matches the Java API, and knowing one automatically means that you can find your way around the other.
To get a full, detailed overview of the Flowable REST API, check out the REST API chapter.
Setting up the REST application
When you download the .zip file from the flowable.org website, the REST application can be found in the wars folder. You’ll need a servlet container, such as Tomcat, Jetty, and so on, to run the WAR file.
Note: The flowable-rest.war is based on Spring Boot, which means that it supports the Tomcat / Jetty servlet containers supported by Spring Boot.
When using Tomcat the steps are as follows:
Download and unzip the latest and greatest Tomcat zip file (choose the 'Core' distribution from the Tomcat website).
Copy the flowable-rest.war file from the wars folder of the unzipped Flowable distribution to the webapps folder of the unzipped Tomcat folder.
On the command line, go to the bin folder of the Tomcat folder.
Execute './catalina run' to boot up the Tomcat server.
During the server boot up, you’ll notice some Flowable logging messages passing by. At the end, a message like 'INFO [main] org.apache.catalina.startup.Catalina.start Server startup in xyz ms' indicates that the server is ready to receive requests. Note that by default an in-memory H2 database instance is used, which means that data won’t survive a server restart.
In the following sections, we’ll use cURL to demonstrate the various REST calls. All REST calls are by default protected with basic authentication. The user 'rest-admin' with password 'test' is used in all calls.
After boot up, verify the application is running correctly by executing
curl --user rest-admin:test http://localhost:8080/flowable-rest/service/management/engine
If you get back a proper json response, the REST API is up and running.
Deploying a process definition
The first step is to deploy a process definition. With the REST API, this is done by uploading a .bpmn20.xml file (or .zip file for multiple process definitions) as 'multipart/formdata':
curl --user rest-admin:test -X POST -F "file=@holiday-request.bpmn20.xml" http://localhost:8080/flowable-rest/service/repository/deployments
To verify that the process definition is deployed correctly, the list of process definitions can be requested:
curl --user rest-admin:test http://localhost:8080/flowable-rest/service/repository/process-definitions
which returns a list of all process definitions currently deployed to the engine.
Start a process instance
Starting a process instance through the REST API is similar to doing the same through the Java API: a key is provided to identify the process definition to use along with a map of initial process variables:
curl --user rest-admin:test -H "Content-Type: application/json" -X POST -d '{ "processDefinitionKey":"holidayRequest", "variables": [ { "name":"employee", "value": "John Doe" }, { "name":"nrOfHolidays", "value": 7 }]}' http://localhost:8080/flowable-rest/service/runtime/process-instances
which returns something like
{"id":"43","url":"http://localhost:8080/flowable-rest/service/runtime/process-instances/43","businessKey":null,"suspended":false,"ended":false,"processDefinitionId":"holidayRequest:1:42","processDefinitionUrl":"http://localhost:8080/flowable-rest/service/repository/process-definitions/holidayRequest:1:42","activityId":null,"variables":[],"tenantId":"","completed":false}
Task list and completing a task
When the process instance is started, the first task is assigned to the 'managers' group. To get all tasks for this group, a task query can be done through the REST API:
curl --user rest-admin:test -H "Content-Type: application/json" -X POST -d '{ "candidateGroup" : "managers" }' http://localhost:8080/flowable-rest/service/query/tasks
which returns a list of all tasks for the 'managers' group
Such a task can now be completed using:
curl --user rest-admin:test -H "Content-Type: application/json" -X POST -d '{ "action" : "complete", "variables" : [ { "name" : "approved", "value" : true} ] }' http://localhost:8080/flowable-rest/service/runtime/tasks/25
However, you most likely will get an error like:
{"message":"Internal server error","exception":"couldn't instantiate class org.flowable.CallExternalSystemDelegate"}
This means that the engine couldn’t find the CallExternalSystemDelegate class that is referenced in the service task. To solve this, the class needs to be put on the classpath of the application (which will require a restart). Create the class as described in this section, package it up as a JAR and put it in the WEB-INF/lib folder of the flowable-rest folder under the webapps folder of Tomcat.